
# Spring 配置文件
# Bean 标签范围配置
scope : 指对象的作用范围:取值如下
| 取值范围 | 说明 |
|---|---|
| singleton | 默认的,单例的 |
| prototype | 多例的 |
| request | WEB 项目中,Spring 创建一个 Bean 对象,将对象存入到 request 域中 |
| session | WEB 项目中,Spring 创建一个 Bean 对象,将对象存入到 seesion 域中 |
| global seesion | WEB 项目中,应用在 Protlet 环境,如果没有 Protlet 环境 那么 globalSession 相当于 session |
当 scope 的取值为 singleton 时
Bean 的实例化个数 : 1 个
Bean 的实例化时机:当 Spring 核心文件被建在时,实例化配置的 Bean 实例
Bean 的生命周期:
- 对象创建:当应用加载,创建容器时,对象就被创建了
- 对象运行:只要容器在,对象一直活着
- 对象销毁:当应用卸载,销毁容器时,对象就被销毁了
当 scope 的取值为 prototype 时
Bean 的实例化个数:多个
Bean 的实例化时机:当调用 getBean () 方法时实例化 Bean
- 对象创建:当使用对象时,创建新的对象实例
- 对象运行:只要对象在使用中,就一直活着
- 对象销毁:当对象长时间不用时,被 Java 的垃圾回收机制回收
验证 :
user 类
1
2
3
4
5
6
7
8
9
10
11
12
13
14
15
16
17
18
public class User {
private String name;
public User() {
}
public User(String name) {
this.name = name;
}
public void setName(String name) {
this.name = name;
}
public void sayHello() {
System.out.println("hello, I am User");
}
}测试用例
1
2
3
4
5
6
7
8
9
10
public class Test {
.junit.jupiter.api.Test
public void scopeTest() {
ApplicationContext context = new ClassPathXmlApplicationContext("ApplicationContext.xml");
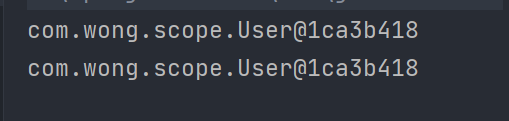
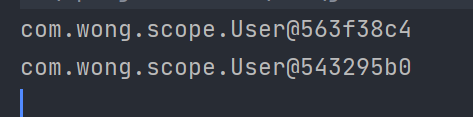
User user1 = (User) context.getBean("user");
User user2 = (User) context.getBean("user");
System.out.println(user1);
System.out.println(user2);
}
}singleton xml 配置 :
1
<bean id="user" class="com.wong.scope.User" scope="singleton"/>
运行结果 :
![image-20220404130651754]()
prototype xml 配置 :
1
<bean id="user" class="com.wong.scope.User" scope="prototype"/>
运行结果 :
![image-20220404130813746]()
# Bean 生命周期配置
- init-method : 指定类中的初始化方法名称
- destroy-method : 指定类中的销毁方法名称
# Bean 实例化三种方式
- 无参构造实例化
- 工厂静态实例化
- 工厂动态实例化
# 工厂静态方法实例化
xml 配置 :
1 | <bean id="user" class="com.wong.instantiation.userFactory" factory-method="FactoryUser"/> |
原理 : xml 配置 user 对象的全类名为该类的工厂类,并制定了该类的静态工厂方法 当初始化 Spring 容器时,新建 User 对象,会自动通过该静态工厂方法来进行实例化
# 工厂实例方法实例化
xml 配置 :
1 | <bean id="userFactory" class="com.wong.instantiation.userFactory"/> |
原理 : xml 配置工厂类的 Bean 对象,然后在 User Bean 中指定其工厂 Bean, 并指定其工厂方法
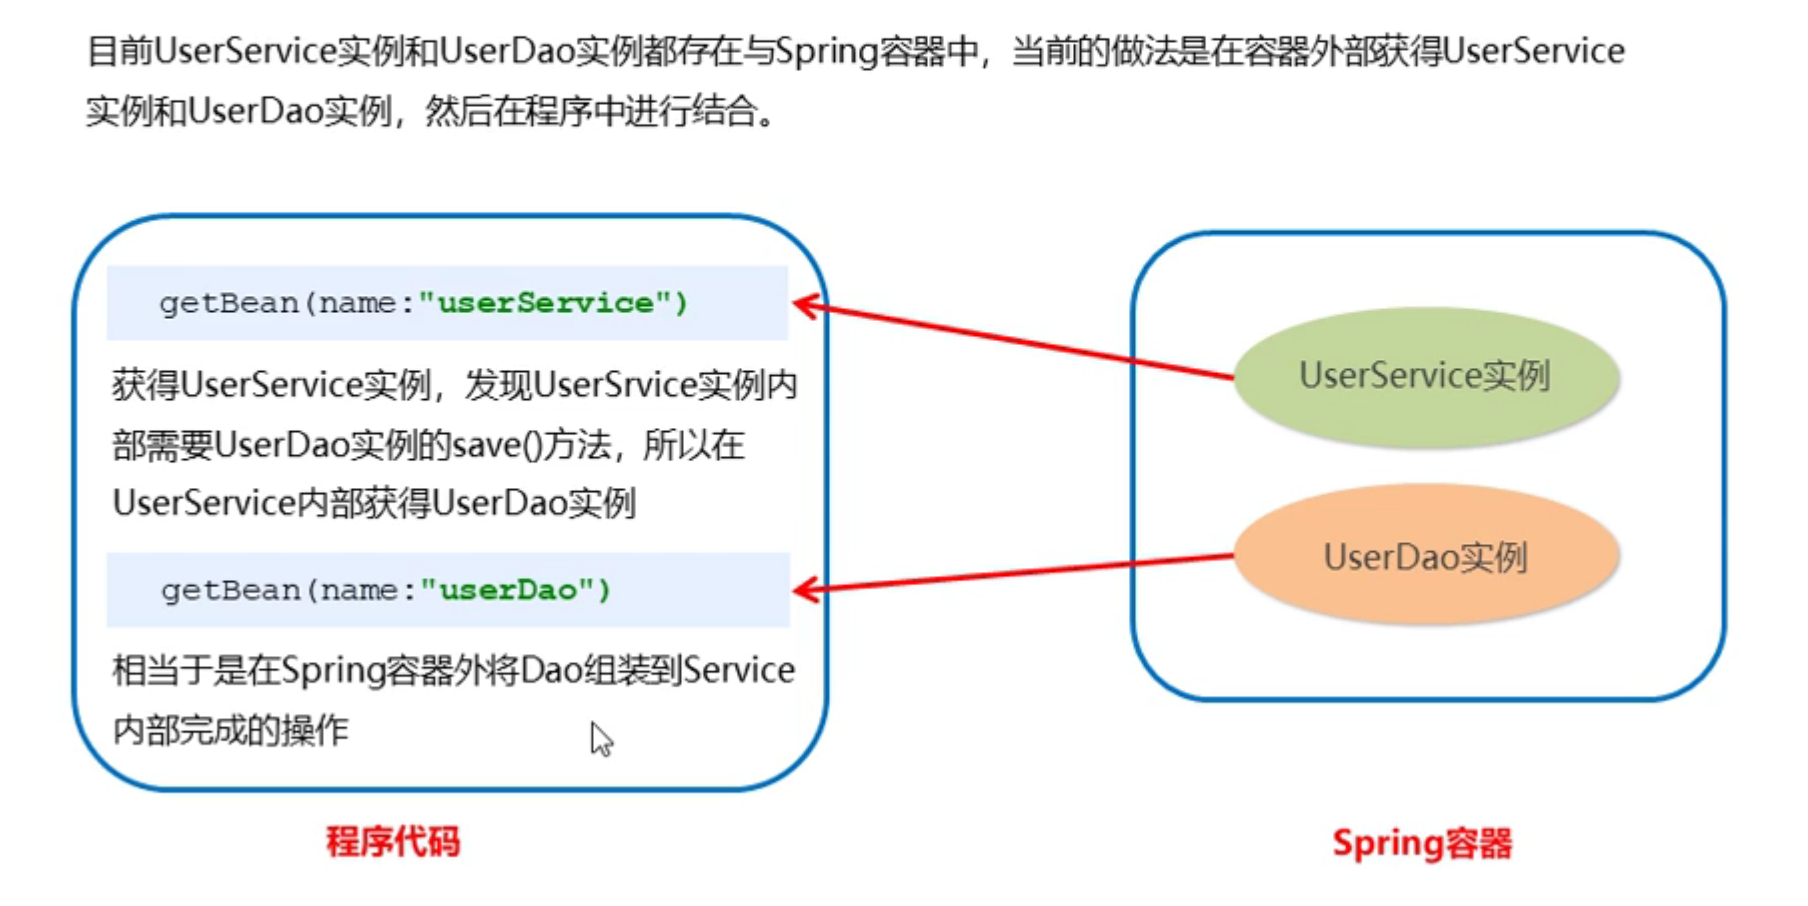
# Bean 依赖注入
# 未使用依赖注入
1 | <bean id="service" class="com.wong.dependencyInjection.ServiceImpl"/> |
1 | public class ServiceImpl implements Service { |
1 | public void normalDITest() { |
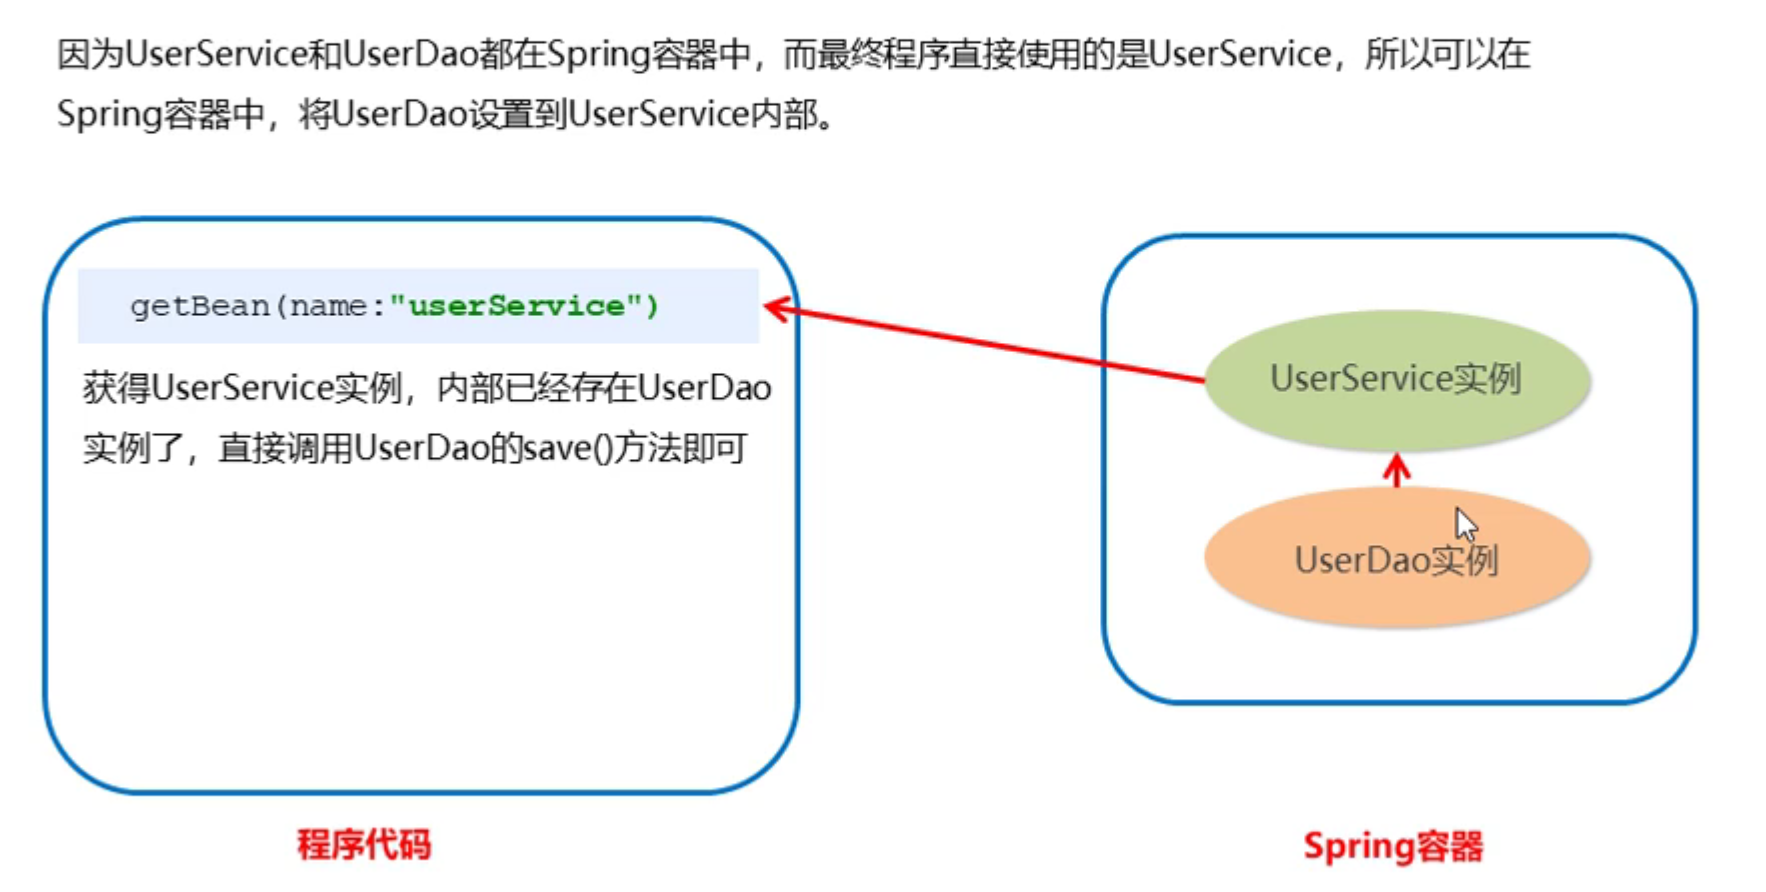
# 使用依赖注入 (set 方法)
1 | <bean id="user" class="com.wong.dependencyInjection.UserImpl"/> |
1 | public class ServiceImpl implements Service { |
1 | public class test { |
p 命名空间注入本质也是 set 方法注入,但比起上述的 set 方法注入更加方便,主要体现在配置文件中,如下 :
1 | xmlns:p="http://www.springframework.org/schema/p" |
其次,需要修改注入方式 :
1 | <bean id="serivce" class="com.wong.dependencyInjection.ServiceImpl" p:user-ref="user"/> |
# 使用依赖注入 (构造器)
1 | <bean id="service" class="com.wong.dependencyInjection.ServiceImpl"> |
# Bean 的依赖注入的数据类型
普通数据类型
1
2<property name="number" value="134"/>
<property name="str" value="hello world"/>引用数据类型
1
<property name="dataTypes" ref="dataTypes"/>
集合数据类型
1
2
3
4
5
6
7
8
9
10
11
12
13
14
15
16
17
18
19
20
21
22
23
24
25<property name="list">
<list>
<value>aaa</value>
<value>bbb</value>
<value>ccc</value>
</list>
</property>
<property name="hashMap">
<map>
<entry key="1" value="1"/>
<entry key="2" value="2"/>
<entry key="3" value="3"/>
</map>
</property>
<property name="set">
<set>
<value>hello</value>
<value>world</value>
</set>
</property>
<property name="subMap">
<map>
<entry key="1" value-ref="user"/>
</map>
</property>
# 引入其他配置文件 (分模块开发)
实际开发中,Spring 的配置内容非常多,这就导致 Spring 配置很繁杂且体积很大,所以,可以将部分配置拆解到其他配置文件中,而在 Spring 主配置文件通过 import 标签进行加载
1 | <import resource="ApplicationContext.xml"/> |